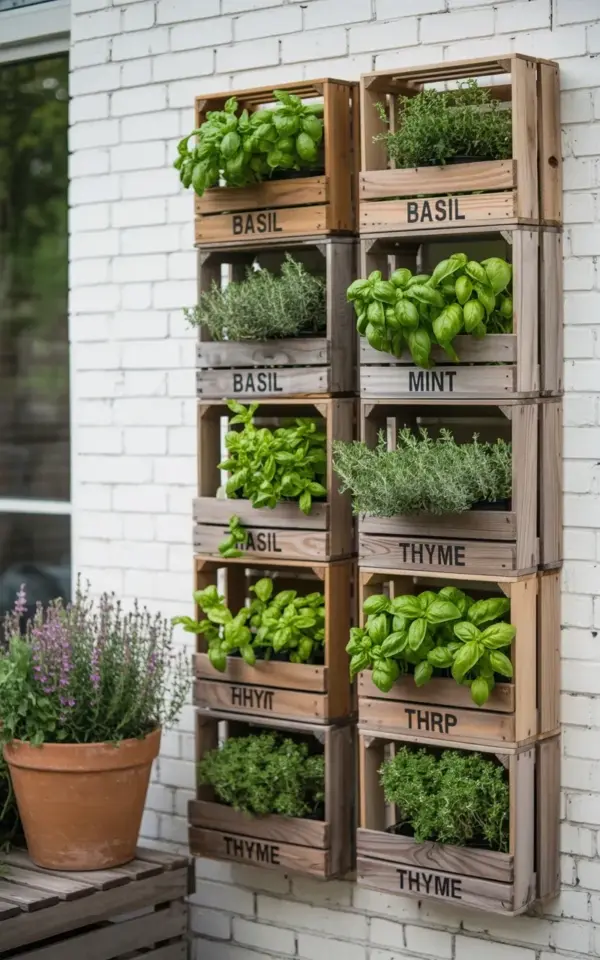
I never thought a blank white brick wall could become my favorite kitchen feature, but then I built this vertical herb garden. Before this, the wall was just a boring expanse of painted brick that collected dust and stared back at me. Now it’s a living wall of weathered wooden crates labeled for basil, mint, and thyme, and honestly, the herbs are thriving in a way that still surprises me every morning. Seeing those lush greens against the white brick feels like a mini farmhouse transformation I never knew I needed. So, let me walk you through exactly how I did it, because you can copy this whole setup in a weekend.
Why a Crate Herb Garden Works So Well
The crate herb garden idea has been floating around Pinterest for a while, but I was skeptical. Would plants actually survive in shallow boxes mounted on a wall? Turns out, yes, they do. And not just survive, but explode with growth. The key is drainage (more on that later) and the right herbs. Weathered wooden crates look rustic and intentional, not like a clumsy DIY project. They also keep the herbs high enough that my dogs can’t dig them up. That alone sold me.
Another reason this works: you can cram them together. The two columns of six crates I built fit on a four-foot-wide section of brick. Each crate is maybe six inches deep and twelve inches long. That’s enough soil depth for basil roots, mint runners, and thyme to spread sideways. You don’t need a huge garden. Just a wall with decent sunlight and some cheap crates.
How I Built My Vertical Garden Layout
Ok so, I started with twelve crates. I found them at a flea market, already weathered and peeling. If you buy new ones, age them yourself with a vinegar and steel wool solution (takes a day). My layout is two columns of six crates, mounted vertically about three inches apart. Each column is attached to a horizontal wooden ledger that I screwed directly into the brick with masonry anchors. I used a level. A lot. It matters because if one crate tilts, the whole thing looks drunk.
- Materials: 12 wooden crates (weathered or aged), masonry anchors and screws, a drill, a level, soil (well-draining potting mix), starter plants (small nursery pots).
- Mounting: Pre-drill holes in the back of each crate, then screw into the ledger. Don’t skip this step. I tried heavy-duty command strips first. They lasted two days.
- Labeling: I used a stencil and black paint for BASIL, MINT, and THYME. You could use chalkboard labels or just write with a marker. I wanted it to look permanent, like a tiny farm stand on my wall.
One weird thing: I almost ran out of crates because I bought them at a garage sale and the seller gave me an extra broken one. I used its wood slats for drainage holes in the bottom of the others. Waste not, want not, right?
Choosing the Best Herbs for Your Wall
Basil, mint, and thyme aren’t just photogenic, they’re practical. Basil gives you big, rounded leaves perfect for pesto or caprese. Mint sends out runners that fill up the crate fast, which is great for tea or cocktails. Thyme is the low-maintenance cousin: fine, feathery, and it doesn’t complain if you forget to water it for an extra day. Not gonna lie, I killed a lot of rosemary and oregano before switching to this trio. Some herbs just don’t want to be in a crate.
Here is the thing with mint. It’s a thug. It will try to leap out of its crate and take over the neighboring thyme. So I keep a pair of scissors nearby and cut it back every two weeks. That actually makes the plant bushier, so it’s a win. Basil? It wants full sun and consistent water. Thyme? Give it a gritty soil mix and let it dry out between drinks. Three herbs, three personalities. Keeps me on my toes.
Tips for Keeping Your Herbs Thriving
Let me save you some frustration. The first two weeks after mounting, I lost two basil plants to root rot. Why? Because I didn’t drill enough drainage holes in the crate bottoms. Each crate needs at least five holes, plus a layer of gravel or wood chips at the bottom to keep soil from clogging them. Water sits in a crate that doesn’t drain. Dead herbs.
Watering is also different on a wall than in a pot. The crates dry out faster because they’re exposed on all sides. I check soil moisture every morning by sticking my finger in. If it’s dry an inch down, I water. Sometimes that means daily in July. Sometimes every three days in fall. The thyme crate? I water it half as often as the basil. Mint is in between.
Sunlight matters too. My white brick wall faces east, so the crates get morning sun and bright indirect light all afternoon. If your wall gets scorching afternoon sun, you’ll need to water more or choose shade-tolerant herbs like mint. Basil can handle it if you stay on top of moisture. Honestly, the white brick helps reflect light back onto the plants. That’s one reason they look so vibrant in the photo.
The Before and After: A Mini Farmhouse Transformation
Before, that white brick wall was a blank canvas. After, it’s the first thing you see when you walk into my kitchen. The weathered wooden crates against the crisp white bricks give off a farmhouse vibe without screaming “PINTEREST FAIL.” And the herbs? They are lush. The basil has huge rounded leaves, the mint trails over the crate edges, and the thyme has that soft, feathery look that makes you want to touch it. I catch myself staring at it while I’m at the sink doing dishes. It’s not just decor, it’s dinner.
If you’re hesitating because you think you don’t have space, or you’re not handy, or you’ll kill the plants, stop. I’m not a carpenter. I’m a person with a drill and a stubborn streak. The most important step is just starting. Find your crates, pick your herbs, and mount that first box. The transformation feels bigger than it sounds. And when you pick fresh basil for a sandwich two months later, you’ll forget all about the blank wall that used to be there.
So, what are you waiting for? Grab some wood, a bag of soil, and three starter plants. Your white brick wall is about to get a whole lot greener.
#verticalherbgarden #herbgarden #crateherbgarden #herbgardenideas #diyherbgarden
Leave a Comment