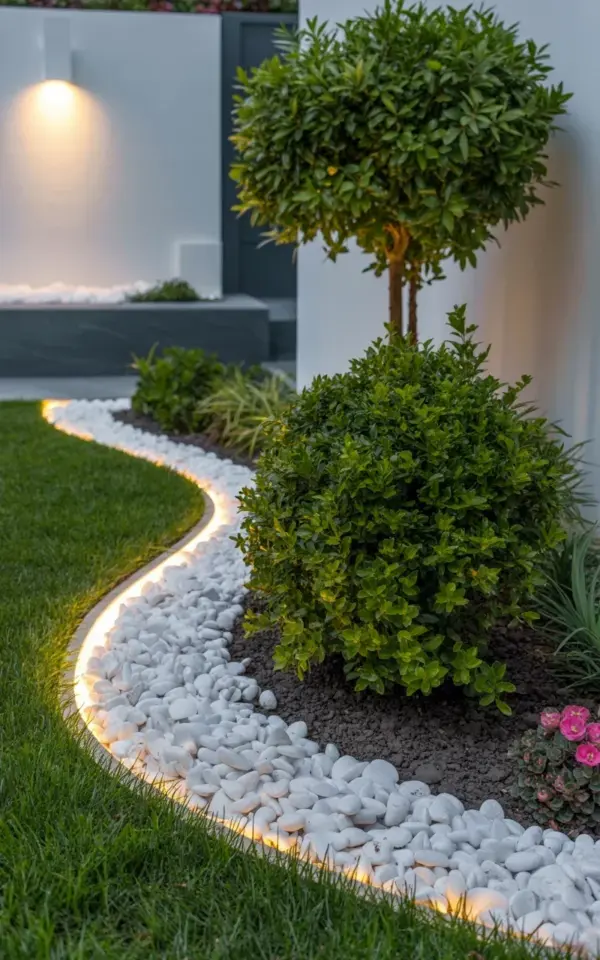
The glow comes from underneath, not from above. That’s the first thing you notice about this modern garden landscape design: a curved line of smooth white river rocks, each one sitting over a soft, warm LED light that makes the dark stones look like they’re floating on a ribbon of light. It runs along the edge of a manicured lawn, outlining a garden bed with a dense green shrub in the center and a small topiary-style tree behind it. Tiny pink flowers scatter near the soil. It’s not flashy. It’s just… calm. And honestly, you can build the same look for under $150 and a weekend.
I’m going to walk you through it the way I actually did it in my own backyard, including the mistakes and the cheaper substitutes that worked just as well. This isn’t a “perfectly planned Pinterest day” guide. It’s more like a “I tripped over the garden hose twice but the result still looks great” guide.
Why a Curved Border Beats a Straight One for Modern Garden Edging
Straight lines are harsh. They look good in formal gardens, sure, but they draw the eye in a rigid line and they make every imperfection obvious. A curve does the opposite. It softens the transition between lawn and garden bed, and it creates a sense of movement that pulls you through the yard.
There’s also a practical side. When you mow the lawn, a curved edge gives you a natural line to follow. You don’t have to worry about a perfectly squared corner where the mower can’t reach. You just ride the curve. And with the LED lighting underneath, the curve becomes a visual guide at night. It’s like having a very subtle runway for your eyes.
One more thing: curves make small yards feel bigger. A bowed border adds depth, especially when the curve opens toward the center of the lawn. So if your backyard is on the cozy side, this is the right call.
Here’s Exactly What You Need for a River Rock Border With Lights
Ok so the material list is shorter than you’d think. I’m giving you the budget-conscious versions, not the expensive landscape contractor stuff. Here’s what I used:
- White river rocks. Buy the 3/4-inch to 1-inch size. I needed about 150 pounds for a 20-foot border. Look for “pebble” bags at home improvement stores; they’re cheaper than buying by the ton.
- Outdoor LED strip lights or LED puck lights. You want low-voltage, 12V, with an IP67 waterproof rating. I used a 16-foot strip that cut into sections. A transformer with a photocell timer is worth the extra $15.
- Garden edging restraint. I used steel landscape edging because it holds a clean line. You can also use flexible plastic or even a thick rubber border. The steel was $30 for 20 feet.
- Landscape fabric. Not the cheap weed barrier, the thicker woven kind. It stops grass from creeping into the rock bed.
- Spray paint or marking chalk for the outline. Chalk is easier if you might change the line.
Don’t rent a rock cutter or buy specialty LED fixtures made for garden borders. The whole point is to keep this cheap and simple. Regular low-voltage landscape lighting tucked under the rocks works beautifully because the rocks diffuse the light evenly.
Laying Out the Curve Without Any Fancy Tools
You don’t need a laser level or string line for this. You need a garden hose, maybe two. Lay the hose on the grass and bend it until the curve feels right. Step back. Look at it from the house, from the sidewalk, from the driveway. Adjust the hose until the eye follows the line naturally without any weird kinks.
Once you’re happy, spray paint along the hose. Use the kind of marking spray that doesn’t wash away in a single day. I used orange because I had it, but white is easier to see on grass.
Now dig the trench. Here’s the thing: depth matters more than width. You want about 3 inches deep and 6 to 8 inches wide. That gives you room for a layer of sand, then the landscape fabric, then the rocks. The sand helps with drainage and keeps the rocks from shifting. The fabric blocks weeds and also creates a little pocket so the rocks don’t sink into the mud.
If you’re like me and you dig with a flat shovel and then go back and clean up with a trowel, expect some wobbly edges. That’s fine. The rocks cover a lot of minor imperfections. Just keep the bottom of the trench as level as you can, because that’s what the LED lights will sit on.
Installing Outdoor LED Landscape Lighting So It Actually Lasts
This is where most people overthink it. You do not need to bury the wire in conduit. You just need to run the low-voltage wire along the inside edge of the trench, and then make sure the connections are dry and secure. Look, moisture is the enemy. Use waterproof wire connectors, the kind that come with a little gel cap or heat shrink. Wrap the connections with electrical tape too if you’re paranoid. I am, so I did both.
For the lights themselves: if you’re using an LED strip, peel off the backing and press it into the bottom of the trench. If you’re using puck lights, lay them flat every 18 inches or so. Then place the rocks over and around them. The light will bounce up between the rocks and create that warm glow against the dark, smooth stones. You want the rocks to partially cover the lights, not completely bury them. Otherwise you just get a few bright spots instead of a continuous line.
Connect the wire to a low-voltage transformer and plug it into a GFCI outlet. I mounted my transformer on the side of the house and set the photocell so the lights come on at dusk. The first time I switched it on, the effect made me stop and stare for a solid minute. It’s not very bright. There’s no harsh glare. It just gives the border this soft, warm aura that outlines the lawn and the garden bed perfectly.
Choosing the Right Shrubs and Pink Flowers to Match the Glow
The photo that inspired this whole project has a dense green shrub in the center of the bed with a small tree behind it. That’s a classic grouping, and it works because the dark foliage contrasts with the white rocks and the light. For a modern look, go with something like boxwood, Japanese holly, or even a compact rosemary bush if you want a little fragrance. The key is dense foliage. Loose, floppy plants look messy against a clean border.
The small tree in the background has rounded topiary-style branches. That might sound fancy, but you can get the same effect with a dwarf Alberta spruce or a standard rose tree. I used a small clipped elm in a container because that’s what I had, and it looked pretty good too.
For the pink flowers, don’t overplant. The photo shows just a few, scattered near the soil. That’s more modern than a solid line of blooms. Try impatiens, begonias, or even creeping phlox. Pink against the dark soil and white rocks is the exact right amount of color. It gives your garden bed a little life during the day, and at night the flowers pick up the warm glow from the LEDs in a way that makes them look almost magical.
Real Budget Breakdown and Money-Saving Swaps
Here’s what it cost me for a 20-foot border, and I’m not padding the numbers. River rocks: $45. Steel edging: $30. Landscape fabric and sand: $20. LED strip with transformer: $38. Waterproof connectors and zip ties: $10. Total came to $143.
If you want to knock that down, swap the steel edging for flexible plastic edging. That saves you $15 and takes about ten extra minutes to install because the plastic bends easier than steel. You can also use regular white pebbles from the garden center instead of premium river rocks. They’re not as smooth, but they’re half the price. And if you already have landscape lighting in your yard, you can just buy a few puck lights and skip the transformer entirely.
One silly thing I learned: buy extra rocks. I didn’t, and I ran out with about two feet left. I had to drive back to the store and the second bag was a slightly different shade of white. It looks fine now, but I still notice it every time I walk by. So get one extra bag, put the leftovers in a bucket, and thank me later.
Maintenance and Safety Tips for Your New LED Rock Border
The good news is this border is mostly self-maintaining. The landscape fabric will stop weeds for a season or two. In the spring, you’ll need to push a few rocks back into place because frost heaves them, but that’s a five-minute job. And the LED lights, if you bought the good waterproof kind, should last for several years.
One warning: if you have kids or dogs, the rocks are tempting to throw. My dog kicked a bunch of them into the grass the first week. Just rake them back. Also, the LED strip lights are tough but not indestructible. Don’t go poking at them with a shovel when you’re planting something new in the bed.
At the end of the day, this modern garden landscape design is not about perfection. It’s about the way the lawn looks at dusk, when the light from the rocks makes the whole yard feel a little softer, a little more intentional. And you built it with your own hands, which honestly feels great.
If you’re ready to try it, start with the curve. Let the lawn be your guide. Then tuck the lights underneath the rocks and watch the whole space change. You might find yourself sitting outside after dinner just to look at it. That’s okay. I still do.
Leave a Comment