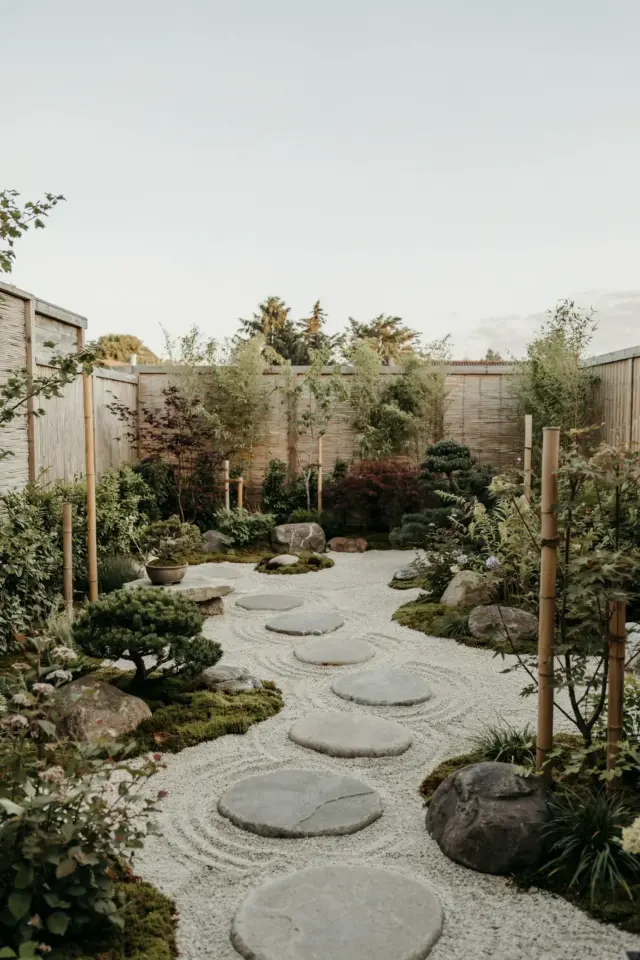
Planning your garden paths and walkways can feel overwhelming when you start browsing photos of elaborate stone mosaics or winding brick lanes. I have been there, staring at a muddy patch of yard wondering where to even begin. The truth is, you do not need a professional landscaper or a huge budget to create something functional and attractive. You just need a practical strategy and a few solid ideas. This post walks you through 21 doable designs, from simple stepping stones to crushed gravel trails, all focused on helping you build something that actually works for your yard.
Step One: Map Your Garden Path Layout
Before you buy any materials, grab a hose or a length of rope and lay out the general route. Walk it a few times to check for awkward turns or bottlenecks. A path that feels natural underfoot is far more successful than one that looks perfect on paper.
Think about the purpose of your garden path ideas. Is it a direct route from the driveway to the front door? Or a meandering stroll through flower beds? For a straight functional path, keep it at least three feet wide. For a secondary walkway, two feet works fine. Mark the edges with spray paint or flour so you can visualize the shape.
21 Practical Ideas for Every Yard Style
I have grouped these walkway ideas into categories based on materials and difficulty. Each one includes a quick tip to help you decide. Here is a bulleted list to skim and save for later.
- Stepping stones on grass: Easy and cheap. Place flat stones a stride apart, then cut the grass around them. You mow right over the stones.
- Pea gravel with edging: Low cost, excellent drainage. Use metal or plastic edging to keep stones off the lawn. Rake occasionally to keep it even.
- Crushed granite or decomposed granite: Compacted with a hand tamper, this creates a firm surface that drains well. Great for modern native gardens.
- Flagstone path: Irregular flat stones set in sand or gravel. Leave gaps for low-growing thyme or moss. Looks rustic but sturdy.
- Brick pavers in a running bond pattern: Classic and durable. Set on a sand base with polymeric sand in the joints to keep weeds out.
- Concrete stepping molds: Pour your own shapes using plastic molds. Cheaper than buying pre-formed pavers, and you can add color.
- Mulch paths: Perfect for shaded areas or temporary paths. Use shredded bark, not large nuggets, to avoid shifting. Replenish yearly.
- Wood rounds: Slices of log set into the ground. Looks charming but can get slippery when wet. Treat with a non-toxic sealer to slow rot.
- Concrete pavers with grass gaps: Lay square pavers with spaces between, then plant creeping thyme or sod. The grass softens the hardscape.
- Recycled rubber pavers: Soft on knees, great for garden paths near play areas or vegetable beds. Easy to install over dirt.
- Gravel with large stepping stones: A combo approach. Place larger flat stones in a gravel bed for stability. The gravel drains, the stones give solid footing.
- Ceramic tile mosaic: Break old tiles or plates and press them into wet mortar. True DIY statement piece. Best for a small patio or landing area.
- Permeable interlocking concrete pavers: Expensive but long-lasting. Stormwater filters through the gaps, reducing runoff. Good for front walkways.
- Slate or bluestone irregular slabs: Staggered pieces give a natural forest look. Set them about half an inch above the ground to keep them dry.
- Railroad tie steps: For slopes, dig in treated timbers and backfill with gravel. Each step should be at least 12 inches deep.
- White marble chips: Bright and reflective, perfect for moon gardens or shaded areas. Keep a rake nearby to spread them back after heavy rain.
- Poured concrete with a broom finish: Rent a concrete mixer for a weekend. Add control joints every four feet to prevent random cracking.
- Brick edge with gravel center: Build a brick border, then fill the middle with pea gravel. Classy look with less material cost than full brick.
- Loose stone with flagstone islands: Place large flat stones as resting spots in a sea of small gravel. Breaks up the monotony and gives the eye a place to rest.
- Reclaimed brick from demolition: Cheaper than new brick and full of character. Clean off old mortar with a wire brush before laying.
- Stamped concrete overlay: If you already have concrete, resurface it with a stamp and color. Looks like natural stone at half the price.
Materials and Budget Tips for DIY Walkways
Your choice of material will affect cost, installation time, and maintenance. For a typical 30-foot path, gravel and stepping stones run under $100. Brick or flagstone might cost $300 to $600 depending on your local prices. Permeable pavers can push over $1,000 for that same distance.
I prefer crushed granite for most of my own backyard landscaping. It compacts well, feels solid under shoes, and lets rainwater soak in without puddles. If you want a softer look, wood chips work but will break down in two seasons. For high-traffic areas, stick with stone or concrete.
How to Install a Simple Stepping Stone Path in One Weekend
This is the most beginner-friendly garden path design. Start by laying out your stones on the grass and adjusting positions until the spacing feels natural. You want each step to land comfortably without stretching or shuffling.
Use a shovel to cut around each stone, lift it, then dig a shallow hole about two inches deep. Tamp down the soil, add a scoop of sand or gravel, then set the stone level. Give it a little wiggle to settle. Once all stones are placed, fill the gaps with soil and sprinkle grass seed. Within two weeks the path will blend right into your lawn.
Common Mistakes to Avoid in Path Design
I have made plenty of errors in my own yard, so learn from them. The biggest mistake is making paths too narrow. A 18-inch path feels cramped when you are carrying a watering can or walking with a friend. Another issue is using sharp gravel that gets stuck in shoes. Round pea gravel or smooth river rock is much easier on bare feet.
Do not skip edging. Without a physical barrier, gravel will migrate into your garden beds and grass will creep into the path. Metal, plastic, or even a simple trench works. Also avoid placing stones too close together if you plant ground cover in between. They need room to grow and breathe.
Maintenance Tips to Keep Your Path Looking Fresh
Different materials need different care. For gravel paths, rake them once a month to redistribute stones and remove leaves. For stone or brick, pull weeds as soon as they appear. A propane torch can kill weeds between pavers without chemicals. For wood rounds, check for rot each spring and replace any that feel spongy.
If you used polymeric sand between pavers, reseal it every two years to keep ants from digging it out. For crushed stone, add a fresh layer every three years to maintain depth. A leaf blower works better than a rake for cleaning loose debris off flat stone paths.
As you plan your own backyard landscaping, remember that a path is more than just a way to get from point A to point B. It guides the eye, defines garden beds, and invites you outside. Pick one or two ideas from this list and start small. You can always expand later.
Which of these 21 ideas fits your yard best? I would love to hear. Drop a comment below or pin this article to your outdoor projects board so you can find it when you start digging. Happy path building.
#gardenpaths #walkwayideas #backyardlandscaping #diyoutdoor #pathdesign
Leave a Comment