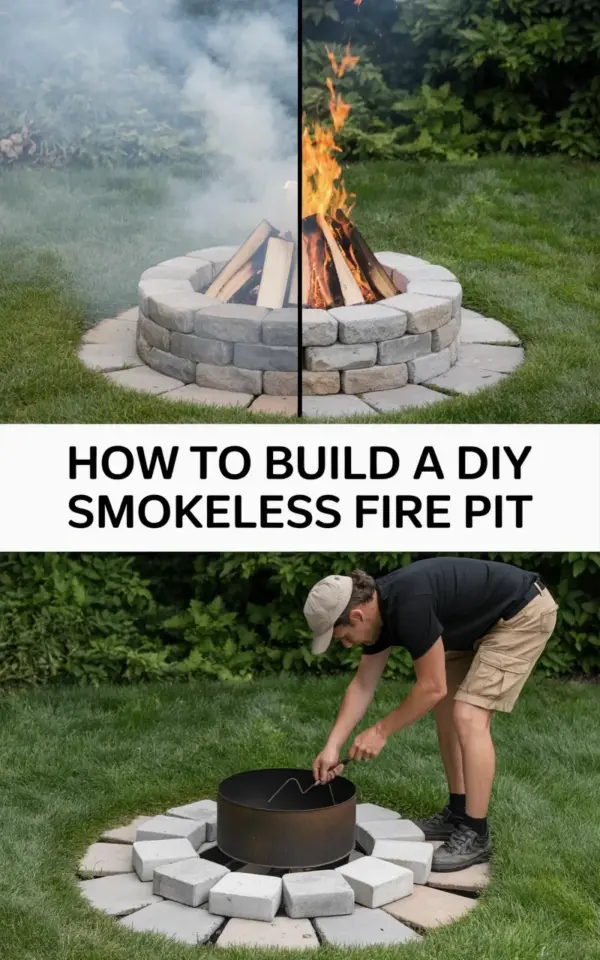
Look, if you’ve ever sat around a backyard fire with your eyes streaming and your hoodie smelling like a campfire for three days, you know the pain. That split-screen photo of the stone fire pit with smoke on one side and clear air on the other is not a filter or a magic trick. It’s the result of a clever double-wall design that burns off the smoke before it ever hits your face. This DIY smokeless fire pit build is genuinely wild, and the best part? You don’t need to be a master mason to pull it off.
The fire pit in that photo shows a stone structure on a green lawn with misty foliage in the background. The left half looks like a typical backyard burn, smoky and hazy. The right half? Flames burning bright, zero visible smoke. That’s what secondary combustion does. It reheats the smoke particles until they ignite, so you get more heat, less smoke, and a much happier evening outdoors.
Why a Double Wall Design Works
Smoke is basically unburned fuel. When wood gets hot, it releases gases, but if those gases cool down before they burn, they turn into the visible white stuff we call smoke. A smokeless fire pit solves this by feeding fresh, pre-heated air into the top of the fire through an inner wall. That extra oxygen reignites the gases.
In the photo, you can see the stone outer shell and the metal inner cylinder doing that exact job. The gap between them acts like a chimney, pulling air in from the bottom and pushing it out through the top holes. It’s a simple physics trick, not a complicated engineering project. Honestly, the whole concept comes down to airflow and heat retention.
You don’t need to buy a fancy brand-name smokeless fire pit for hundreds of dollars. Building one yourself is absolutely doable over a weekend. And the payoff is huge when you compare the smoky left side of that split screen to the crystal clear right side.
Materials and Tools for Your Fire Pit Build
For this project, you’ll need a few specific things. The inner wall is the critical piece, so don’t skimp on it.
- A large steel pipe or a stainless steel fire pit insert, around 24 to 30 inches in diameter
- A smaller steel pipe or perforated tube for the inner burn chamber
- Landscape blocks or natural stone for the outer shell
- Gravel or paver base for the foundation
- A drill with a metal cutting bit (if your pipe doesn’t have holes already)
That small inner pipe is what creates the double-wall effect. It sits inside the larger pipe, leaving a gap for air to travel. Then you drill two rows of holes near the top of the inner pipe so the pre-heated air shoots into the fire. Some people just use a single large pipe and a smaller bucket inside it with holes drilled all around.
Here’s a weird but practical detail: I used a smaller pipe with a diameter about half the size of the outer pipe. It worked fine, but a slightly bigger ratio around 60% seems to burn cleaner. You’ll find what works for your specific setup. The stone outer shell is mostly for looks and heat mass, but it does help hold the structure together while the metal does the real work.
Building the Base and Assembling the Inner Chamber
Start by leveling a spot on your lawn. In the photo, the fire pit sits right on the grass, and that’s fine for many setups, though a gravel base handles runoff better. Dig down about four inches, lay down some paver base, and tamp it flat. This prevents the blocks from shifting when the ground freezes and thaws.
Drop your large steel pipe in the center. Place the smaller pipe inside it, centered as best you can. If you want a true double wall that hides the inner pipe entirely, pour some gravel or sand into the gap at the bottom to keep the small pipe from wobbling. The gap at the top stays open so air can flow through the holes and into the fire.
Drill a ring of holes around the small pipe, about four to six inches from the top. Space them roughly one to two inches apart. Those holes are the secret. They deliver a curtain of fresh air right where the smoke is the thickest, which forces that secondary burn.
Assembling the Stone Outer Ring
This is where the project starts to look like the photo. You’ll stack your landscape blocks or stones in a circle around the steel pipe. The blocks should fit snugly against the metal so smoke can’t escape around the sides and make the whole thing pointless.
Leave no gaps in the mortar if you’re using it, or use a dry stack method if your blocks have a lip. The key is making sure the only path for combustion air is from below, up through the gap, and out the holes. If the fire pit leaks air from the sides, it disrupts the airflow and you’ll get more smoke.
It took me three tries to get the stone ring perfectly level. The first attempt looked like a crooked smile. You live and learn. Just keep a rubber mallet nearby and adjust as you go.
Burning It In: The Before and After Moment
Ok so the first fire is always the test. You need to build a small, hot fire to cure the paint on the metal if it’s coated, and to let the stone dry out completely. Wet stone from the day before can cause steam and cracking, so do a low, controlled burn first.
Then build a proper fire. Get some good hardwood, skip the pine if possible, and let the flames get roaring. Give the wall about 15 minutes to heat up. That’s when the airflow kicks in.
Here’s the thing: the contrast in that split-screen image is real, but it takes a full bed of hot coals. When you see the smoke curl up, reach the top hole line, and vanish, you’ll realize the whole build was worth it. The fire draws air faster, the flames dance higher, and the smoke just… stops. Not completely at first, but within 20 minutes it’s dramatically reduced.
Choosing the Right Wood for a Smoke-Free Burn
Your fire pit design is only half the battle. The wood you burn matters just as much. Seasoned hardwood with low moisture content, like oak, hickory, or maple, burns much hotter and cleaner than green or wet wood.
Green wood is full of moisture that has to boil off before it can burn, which turns your clear-air fire pit into a smoky mess. Split logs that have been drying for at least six months are your best bet. Softwoods like fir or spruce burn fast and produce more creosote, which lingers in the air and coats your clothes.
Store your wood under a tarp or in a shed. Nothing ruins a perfect smokeless fire pit experience like trying to burn damp, rain-soaked logs.
Troubleshooting: Why Is Your Fire Pit Still Smoky?
If your first few burns aren’t perfectly clear, don’t panic. A few common issues cause most of the smoke.
The airflow might be blocked by ash buildup in the gap between the walls. Clean that out after every burn. Or your fire might be too small. You need a hot, vigorous flame to sustain secondary combustion.
Another culprit? Wet wood. Honestly, this is the most common reason people blame the fire pit when the wood is the real problem. And if the holes you drilled are too small, the oxygen supply won’t be enough to burn off all the smoke particles. Try enlarging them slightly or adding a second row.
Also, give it time. A smokeless fire pit works best once the fire is established and the stones have absorbed some heat. It won’t be instantly smoke-free from the second you strike the match. Give the system a few minutes to do its job.
Safety Tips and Placement for Your DIY Project
Place the fire pit at least 10 feet away from your house, sheds, or overhanging branches. The heat output from a double-wall design is significantly higher than a traditional fire pit, so the clearance matters more than you’d think.
Use a spark screen when you step away, even briefly. And never leave the fire unattended, especially with kids or pets running around. The metal edges get extremely hot, so warn guests not to lean on the stone ring until everything cools down.
One last thing: check your local regulations. Some areas have burn bans or require permits for open fires. It’s a boring step, but a quick online search saves you from a hefty fine.
The whole project took me about six hours spread over two days. Not bad for a permanent backyard upgrade that turns the most annoying part of a campfire into a non-issue. If you’re on the fence, just go for it. Even if your stone stacking is a little uneven (like mine), the smoke-free payoff is worth every minute.
Got a fire pit build of your own? Save this post for your backyard project list and share your results. I’d love to hear how the smoke-free before and after turned out for you.
#DIYFirePit #SmokelessFirePit #BackyardProjects #FirePitBuild #OutdoorDIY
Leave a Comment