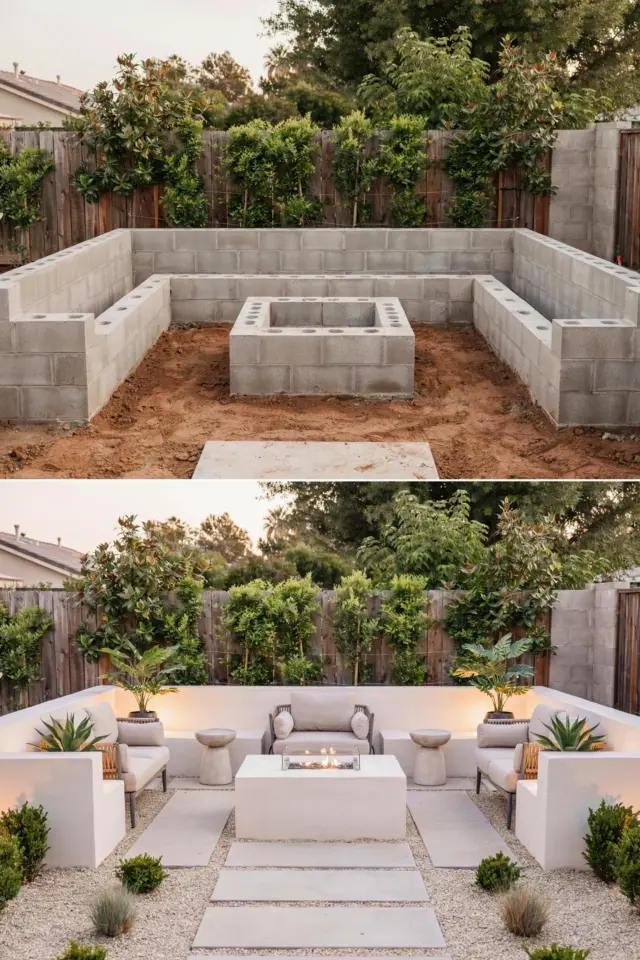
I spent last summer hauling cinder blocks from the back of my hatchback, one trip at a time. My goal was a DIY cinder block backyard seating area with fire pit that would actually look like something from a magazine, not a construction site. After a few weekends of trial and error, I ended up with a lounge that my neighbors keep asking about. It works for late night parties and fall bonfires, and the whole project cost less than a single patio sofa. Here is exactly what I did, what worked, and what I would change if I did it again.
Choosing the Right Cinder Blocks and Layout
I started by deciding on a simple U shape. That gave me two facing benches and a space in the middle for the fire pit. Standard 8x8x16 inch cinder blocks are cheap, around two dollars each at most home centers. I needed 48 blocks for the seating alone. For the fire pit, I used a separate set of 24 half height blocks (4x8x16) to keep the flames at a comfortable sitting height. The total block count was 72, which felt manageable for a weekend project. I laid them out on the grass first to check the spacing. Leave at least 12 inches between the benches and the fire pit so people can walk through without stepping over blocks.
Preparing the Ground for a Stable Base
You cannot just set cinder blocks on bare dirt and expect them to stay level. I dug out a 4 inch deep rectangle about 12 feet by 10 feet. Then I tamped the soil with a hand tamper and added a layer of landscape fabric to stop weeds. On top of that, I poured about 2 inches of crushed gravel and tamped it again. This took a full afternoon but was the difference between a wobbly mess and a solid foundation. I also checked level every few feet with a long bubble level. If you skip this step, your seating will shift after the first heavy rain.
Painting and Finishing the Blocks for a Sleek Look
Raw gray cinder blocks look like they belong at a construction site. I gave mine two coats of exterior masonry paint in a warm charcoal tone. That alone made a huge difference. But the real transformation came from a thin layer of stucco. I mixed a bag of pre mixed stucco finish with water until it was the consistency of thick pancake batter. Then I troweled it onto the front faces of the blocks only, leaving the top surfaces bare for cushions. The stucco hid the rough texture and gave the whole structure a smooth, almost modern feel. Let it cure for a full 48 hours before moving anything onto it.
Building the Fire Pit Insert
Inside the U shape, I stacked the half height blocks in a circle about 36 inches across. I dry stacked them without mortar so I can take them apart later if needed. The key is to stagger the joints so the stack stays stable. I left a 2 inch gap between the fire pit ring and the seating blocks to allow air flow. For the fire bowl itself, I bought a pre formed steel fire ring from a big box store and dropped it inside the block circle. This prevents the blocks from cracking from the heat. I also spread a layer of pea gravel inside the ring, about 6 inches deep, to keep the dirt from turning to mud after a rain.
Adding Gravel, Pavers, and a Walkway
After the blocks were painted and stuccoed, I filled the center area around the fire pit with more crushed gravel. I chose a light beige color to contrast with the dark charcoal seating. For the walkway leading from my back patio to the seating area, I used square concrete pavers set into the gravel. Each paver sits flush with the gravel surface so nobody trips. I also added a border of larger stones along the edges to keep the gravel from spreading into the lawn. This mix of textures, gravel, pavers, and painted blocks, made the whole project look intentional and polished.
Seating Comfort and Cushion Options
Raw cinder block tops are not comfortable to sit on for more than a few minutes. I bought outdoor cushions that are 24 inches long and fit perfectly across two blocks. Each cushion is about 4 inches thick and has a removable cover for washing. I found a set of six in a light cream color that contrasts nicely with the dark blocks. For extra comfort, I added a few throw pillows made from outdoor fabric. The total cushion cost was about $80, which is still way less than a store bought patio set. I also placed a small side table made from a leftover paver on top of a short block stack so people have a spot for drinks.
Fire Safety and Nighttime Setup Tips
One thing I overlooked at first was keeping the area safe for late night use. I installed three solar pathway lights along the walkway so guests can see where they are stepping. I also keep a metal fire pit screen on hand to contain sparks. The gravel surface around the fire pit is non flammable, which gives me peace of mind. For ambiance, I hung a few string lights from a nearby tree branch to create soft overhead lighting. The combination of the fire glow, the string lights, and the dark stained blocks makes the space feel like a cozy outdoor living room after dark.
Budget Breakdown and Time Investment
Here is the rough cost for my project. Prices are from summer 2023 so yours may vary.
- 72 cinder blocks: $144
- Exterior masonry paint and primer: $35
- Pre mixed stucco finish: $20
- Crushed gravel (about 1 cubic yard): $40
- Landscape fabric and hand tamper rental: $15
- Steel fire ring: $50
- Outdoor cushions and pillows: $80
- Pavers for walkway (12 pieces): $25
- Solar lights and string lights: $30
Total came to around $439, and I spread the work over three weekends. The most time consuming part was the ground prep and the stucco application. Everything else went fairly fast. If you have a helper for the block moving, you can cut the time in half.
What I Would Do Differently Next Time
If I built this again, I would use a sealer on the painted blocks before adding cushions. After one rainy season, I noticed a little chipping on the edges where water sat. A clear masonry sealer would have prevented that. I also wish I had added a small storage bench made from a few extra blocks and a wooden lid, just to keep firewood dry and close by. And I would have placed the fire pit a few inches lower. Raising it too high makes it harder to toast marshmallows while sitting on the benches. These are small tweaks, but they would make the space even more practical for regular use.
This DIY cinder block backyard seating area with fire pit became the most used spot in my yard from June through October. Friends bring blankets, we roast hot dogs, and the fire keeps everyone warm well past midnight. I love that it is sturdy enough to last years but budget friendly enough that I do not stress about scratches or spills. If you are looking for a weekend project that gives back every night, this is a good one to try. Start with a flat piece of ground and a stack of blocks, then see where your own custom layout takes you.
Have you built something similar or do you have questions about the process? I am happy to share more details in the comments. Save this to your outdoor living board so you can come back to it when you are ready to start your own build.
#cinderblock #backyardseating #firepit #DIYpatio #outdoorliving
Leave a Comment