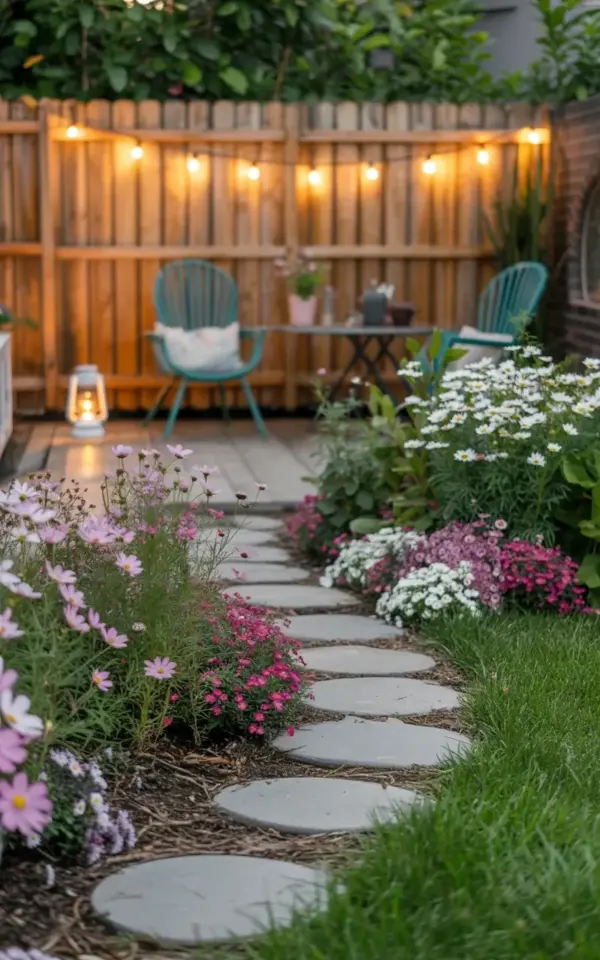
Look at the way that path curves. It doesn’t rush anywhere, it just swings past the pink cosmos on the left, the white daisies on the right, and lands at a teal chair that’s clearly waiting for someone with a cold drink. That is the whole appeal of gardenpathideas like this one. They feel intentional, but they’re actually pretty simple to copy in a single weekend.
Start With the Curve, Not the Stones
Most people pick stones first. Then they try to force them into a shape, and the result looks like a broken sidewalk. Here’s the better order: map the curve on the ground with a garden hose or a rope, then lay stones along that line. The curve should be generous, not wiggly. One slow sweep from the fence to the chair feels calm. Three little bends look nervous.
Stand at the start of the path and check the view. You want to see the chair at the end, but not the whole path at once. That partial view is what makes a curved walkway feel like a discovery. And honestly, it takes two minutes to adjust a hose. Do that before you pick up a shovel.
Choosing Large Flat Stones for a Backyard Walkway
Large, flat stones are your friend here. The ones in the photo are roughly the size of a laptop opened up, maybe a little bigger. That size means you only need a few stones to make a real backyard walkway, which keeps the cost down and the work light. You’re not building a Roman road. You’re setting down stepping stones that happen to curve.
Look for stones with at least one fairly flat face. Uneven edges are fine, they add character, but the top should not wobble when you stand on it. If you’re buying from a landscape supply yard, tell them you want “steppers” and pick through the pile yourself. The ones stacked on top are never the best ones.
- Bluestone works great and looks classic.
- Flagstone (the irregular kind) gives that natural, slightly wild feel.
- Concrete pavers are cheaper and honestly fine if you’re on a budget.
- Avoid round river stones. They roll under your feet and drive everyone crazy.
Pink Cosmos and White Daisies Along a Stone Garden Path
The planting is what makes this a stone garden path instead of just a walkway. In the photo, the pink cosmos are clustered on the left and the white daisies on the right. That’s not random. Cosmos grow tall and airy, so they create a soft screen on one side. Daisies stay lower and bushier, which gives the other side a tidy edge. Together they frame the path without hiding it.
Don’t plant them in straight rows. Scatter them in loose groups, like someone dropped a packet of seeds and walked away. Cosmos are absurdly easy to grow from seed, just press them into the soil after the last frost and water them until they sprout. Daisies are perennials, so they’ll come back and slowly spread. You’ll be dividing them in a few years, which is a good problem to have.
The Teal Chair Trick for Garden Path Design
Here’s the thing about garden path design: the path needs a destination. A curve that ends nowhere just looks like a mistake. In the photo, the teal chair at the end gives the whole scene a reason to exist. It says, walk this way, then sit down. That’s a powerful little trick.
You don’t need a fancy chair. A thrift store find painted a bold color works perfectly. Teal is great because it pops against green foliage and gray stone. But a bright yellow stool or a rust-red bench would do the same job. Place it so it’s slightly visible from the start of the path, not completely hidden. You want just enough of a tease.
String Lights Over the Backyard Garden
String lights add the magic, but they also serve a practical purpose. A backyard garden often gets ignored after sunset. Hang lights along the fence or between two posts, and suddenly the space is usable in the evening. The warm glow in the photo makes the teal chair look like a stage set. It’s hard to overstate how much this changes the mood.
Use outdoor-rated string lights with warm white bulbs, not bright white. The warmer tone makes everything look softer. You can hang them high and let them drape, or run them straight along the fence line. Just make sure they’re secured well. A friend of mine used cheap zip ties and spent half the summer re-hanging them every time it got windy.
A Weekend Plan for Laying the Path Yourself
Here’s the honest timeline. Dig a shallow trench along your marked curve, about 2 inches deep, just enough to seat the stones. Add a layer of sand or gravel to level each stone individually. Tap it with a rubber mallet, check it with a spirit level, and move on. It’s not a technical project, but it does require patience. You’ll spend more time kneeling and adjusting than you think.
Set the stones about one step apart, measured from the middle of one to the middle of the next. A little overlap is fine. Leave gaps between stones and fill them with soil, then sow a low-growing ground cover like creeping thyme if you want a green effect. Or just leave the gaps open. The photo shows bare soil around the stones, which looks clean and lets the cosmos and daisies do the talking.
By Sunday evening, you’ll be sitting in that teal chair, looking back at the path you made, and wondering why you put this project off for so long. That’s the thing about these gardenpathideas. They’re not about perfect execution. They’re about making a small, crooked, beautiful line through your yard, and then getting to walk it every single day.
Got a curve in mind? Grab a hose, mark it out, and see where it takes you. These projects are more forgiving than they look, and the payoff is exactly what you’re imagining.
Leave a Comment