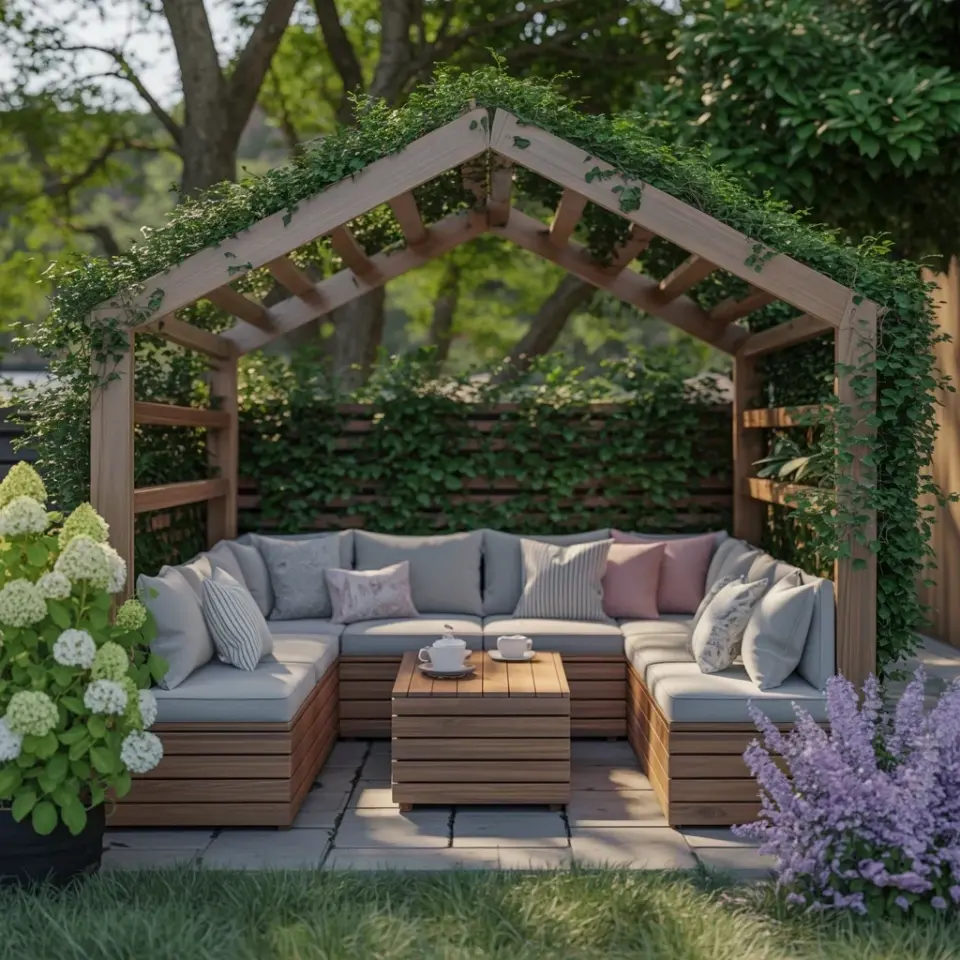
There’s nothing quite like having built-in garden seating that feels made just for your space. I remember the first time I sat on a friend’s homemade concrete bench wrapped around her oak tree. It was solid. It was comfortable. And honestly, I was jealous. So when I started planning my own patio, I knew I wanted that same custom feel without paying a carpenter’s ransom. These 15 ideas are perfect for creating a cozy patio vibe without the custom furniture markup, and they’re totally DIY friendly. Save this for your next patio project.
Why Choose Built-In Over Store Bought (And a Quick Reality Check)
Ok so here’s the thing. Store bought patio furniture can get wrecked by one bad hailstorm. I know, because my cheap metal chairs rusted after two seasons. Built-in seating? It stays put. It won’t blow away in a gust of wind, and it makes your yard feel intentional, not thrown together. But it’s not for everyone.
You need a small tolerance for sawdust and a willingness to measure twice. Cut once. Then maybe recut because you forgot the depth of your cushion. Not gonna lie, I did that. Twice.
Anyway, the payoff is huge. You get seating that literally becomes part of your garden. It can hide ugly retaining walls, double as planters, and give guests a place to sit without dragging out folding chairs. Let’s get into the how.
Plan Your Layout Before You Touch a Single Board
Grab a piece of graph paper. Or, like me, use a napkin from your last takeout dinner. Sketch your patio or yard, noting where the sun hits and where people naturally gather. That spot by the grill where everyone hovers? Perfect for a narrow bench. That awkward corner where nothing fits? L-shaped seating, my friend.
You also want to think about traffic flow. Leave at least 3 feet of walking space in front of the seating. Otherwise people will be climbing over cushions and stepping on your petunias. Ask me how I know. (Answer: I didn’t leave enough space and now my petunias are permanently squished.)
- Measure the area width and depth. Don’t forget to account for overhang if you’re adding cushions.
- Mark utilities. Water lines, gas pipes, buried cables. Hit one of those and your cozy patio becomes a costly headache.
- Decide on bench height. Standard is around 18 inches, but test a chair you already own to see what feels right for you.
- Pick a shape. Straight, L-shaped, U-shaped, or curved around a tree. Curve requires more skill but looks incredible.
Materials That Actually Last (And One I’d Never Use Again)
I tried pressure treated pine for my first project. Fine for a season, but then it started cracking and splintering. Look, cedar is your best friend. It resists rot, smells nice, and weathers to a silvery gray that looks natural. Redwood works too if you have the budget. Concrete blocks are another option, especially if you want a rugged, modern feel.
But here’s a weird little aside: avoid interlocking plastic deck tiles for seating. They look neat on Instagram but they buckle under weight. I built a two-foot-high planter bench with them and it sagged like a hammock. Not cute.
For the seat surface, consider using hardwood like ipe if you can afford it. Otherwise, cedar with a good sealant does the job. And for heaven’s sake, use exterior grade screws. Stainless steel if possible. Your future self will thank you when you don’t have rust streaks running down your beautiful bench.
Build a Simple Concrete Block Bench With a Wood Top (Two Hour Project)
This is the most beginner friendly idea. Honestly, it’s almost too easy. You buy concrete blocks (the ones with two holes), stack them in a row, and place a thick piece of cedar on top. That’s it. But there’s a trick.
You need to level each block. Use a long spirit level and shim with gravel under any low blocks. Then glue the blocks together with construction adhesive so they don’t shift when someone sits down. I speak from experience: a wobbly block bench will dump your drink. And your dignity.
For the wood top, go at least 2 inches thick so it doesn’t flex. Sand the edges round so nobody gets splinters. And seal it with a UV resistant outdoor oil. Reapply once a year. Done.
Corner L-Shaped Seating With Built In Planters (The Space Maximizer)
Got a small patio? Corner seating is your best bet. Build two sections of bench that meet at a 90 degree angle, and use one of the open corners for a planter. Or two planters. Or a little herb garden you can reach from your seat.
I built mine using 2×6 cedar boards for the frame and 2x4s for the seat slats. Left a gap between slats for drainage and air circulation. The planter box sits on the outside corner, made from leftover wood lined with landscape fabric. It holds mint and basil. Smells amazing when you brush against it.
Here’s a tip nobody tells you: add a slight angle to the backrest. Like 10 degrees. It makes a world of difference for comfort. Otherwise you’re sitting bolt upright like you’re in a school cafeteria. Not the vibe you want for summer hangouts.
Fire Pit Surround Seating That Doubles as a Focal Point
If you have a fire pit, you need seating around it. And I don’t mean those cheap metal chairs that tip over when the wind picks up. Build a low octagonal or semicircular wall with concrete blocks or stone. Then cap it with wide wooden or stone seat slabs.
The key is height. The seat should be 16 to 18 inches high, which is a few inches lower than normal chairs. That way your feet can rest flat on the ground and you’re at a comfortable roasting distance from the fire. Go much higher and you’ll have to hunch over to toast marshmallows.
I added a small lip on the inside edge of my seat to stop cushions from sliding off. Honestly, it’s the most used spot in my entire yard. Even in winter (with a fire going, obviously). People sit, talk, and forget to leave.
DIY Storage Bench With Hinged Lids (Hide the Mess)
Outdoor cushions get dirty. Gardening gloves get lost. Kids leave toys everywhere. A storage bench solves all that. Build a simple rectangular box frame with a front panel that opens, or a top that lifts on hinges.
I used marine grade plywood for mine (expensive but waterproof) and added gas struts so the heavy lid doesn’t slam on my fingers. Because ouch. Cut a notch for fingers to lift, or install a recessed handle. Paint or stain to match your garden.
Just remember to drill a few small drainage holes in the bottom. Otherwise you’ll open the lid one day to find a science experiment growing on your throw pillows. Been there, not fun.
Add Cushions and Backrests Without Breaking the Bank
Hard wooden benches look great but they aren’t comfortable for long sits. You need cushions. But outdoor specific cushions are pricey. Here’s my hack: buy cheap foam mattress toppers, cut them to size with an electric knife (the kind you use for Thanksgiving turkey), and wrap them in outdoor fabric. Staple gun the fabric to the underside of a plywood base. Boom. Custom cushions for a fraction of the cost.
For backrests, I use old canvas drop cloths folded double and tied to the bench frame with rope. It looks rustic, it’s washable, and it costs like ten bucks. Plus you can change the color seasonally if you want. That’s patiodecor at its finest.
One last thing: store cushions when you’re not using them. UV rays fade fabrics fast. I learned that after my bright orange cushions turned a sad peach color in one summer. Not my best look.
Wrapping It Up (And Your Next Step)
Built-in garden seating doesn’t have to be complicated. It just has to fit your space and your skill level. Start small. A simple bench. Add a planter or two. See how it feels to have a patio that actually works for your life.
If you build one of these ideas, tag me or leave a comment (I read them all). And honestly, just go for it. You’ll be surprised what you can create with a few boards and a Saturday afternoon. Your garden is waiting for its permanent seat. Go give it one.
#builtinseating #patiodecor #diygarden #backyardideas #cozyoutdoor
Leave a Comment