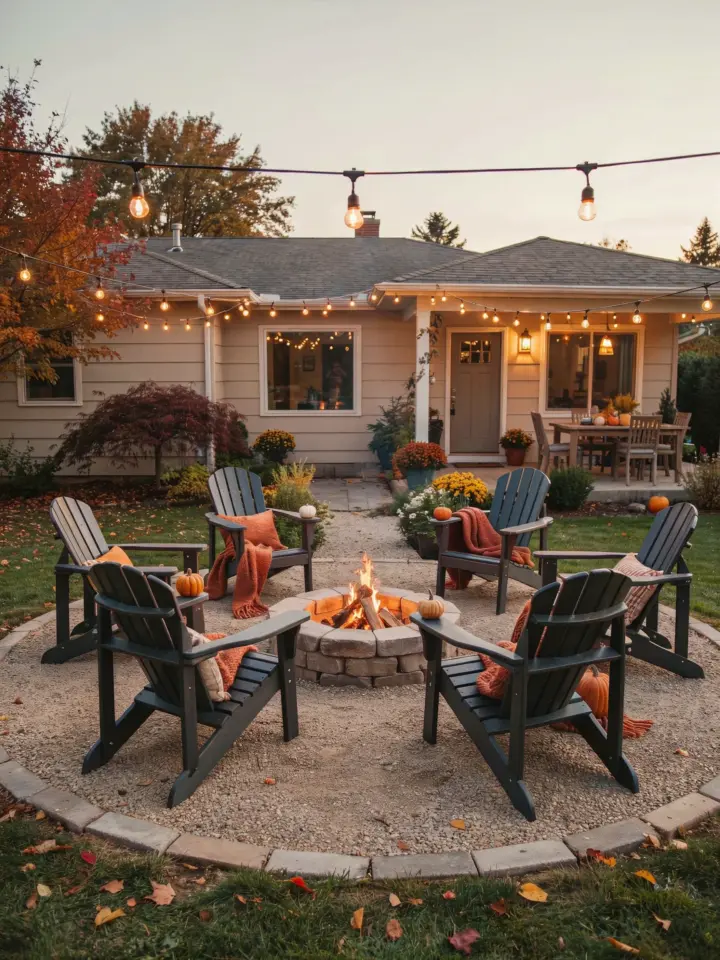
If you have been dreaming of a cozy spot to gather around on cool evenings, a backyard gravel fire pit might be the perfect answer. It is one of those projects that looks professional but stays surprisingly simple and affordable. With just a few basic materials like pea gravel and fire brick, you can transform a plain corner of your patio into a warm, inviting focal point. This guide walks you through different ways to design your own, so you can pick the theme that fits your outdoor space best.
Choosing the right location for your gravel fire pit
Before you buy a single bag of gravel, take a walk around your yard. The spot you pick will shape everything else. Look for level ground that sits at least 10 feet away from your house, fence, or any overhanging branches. You also want to avoid low areas where rainwater collects. Gravel drains well, but standing water under the pit can cause the bricks to shift over time.
Think about wind direction too. Place the fire pit on the side of your patio where the prevailing breeze will carry smoke away from your seating area. If you have a small yard, a corner near the garden can feel surprisingly private. Mark the center with a stake and tie a string to it. Use that string to draw a circle for your pit. A diameter of 3 to 4 feet works for most patios.
Materials you need for a budget-friendly build
The beauty of a gravel fire pit is that it uses simple, cheap supplies. You do not need a concrete base or expensive retaining wall blocks. Here is what you will likely pick up at the home center:
- Pea gravel – about 2 to 3 cubic feet for a 4-foot circle, plus extra for the border
- Fire brick or concrete pavers – standard red clay bricks will crack from heat; use fire-rated bricks or plain concrete pavers for the inner ring
- Landscape fabric – one roll to keep weeds from growing up through the gravel
- Metal fire ring – optional but recommended for a clear fire boundary (a $30 kit works fine)
- Edging stones or steel landscape edging – to hold the gravel in place
You can often find leftover fire bricks or pavers on local marketplace listings for almost nothing. That makes this whole project cost between $50 and $100 if you already own a shovel and a level.
Step by step: building your gravel fire pit base
Start by removing the grass or sod inside your drawn circle. Dig down about 3 to 4 inches across the whole area. This does not need to be perfect, just deep enough to hold the gravel without spilling over the edge. Lay down landscape fabric over the bare dirt to block weeds. Cut a small X in the center if you want to stake a temporary fire ring later.
Pour the pea gravel into the circle and spread it evenly. A 3-inch layer of gravel gives good drainage and keeps the pit from shifting. Tamp it down with the back of a shovel or a hand tamper. Now arrange your fire bricks in a ring around the outer edge of the gravel. Leave a small gap between each brick for airflow. If you are using a metal fire ring, set it in the center on top of the gravel and surround it with the bricks snugly.
Finish by adding a border of larger edging stones or steel edging around the whole circle. That keeps the pea gravel contained when people walk near the pit. Let the gravel settle for a day or two before you light your first fire.
Creative seating and decor ideas for your gravel fire pit area
A fire pit is only as good as the seating around it. For a laid-back vibe, use wooden Adirondack chairs or simple folding camp chairs. They are easy to move and store. If you want something more permanent, build a low stone bench along one side of the pit. Stack a few flat fieldstones without mortar. Leave gaps for gravel to fill in naturally.
Add soft lighting with solar lanterns hung from shepherd hooks or string lights draped between posts. A side table made from a log slice or a cinder block topped with a round of wood holds drinks and marshmallow sticks. Scatter a few large river rocks around the outer edge to create a natural path. These small touches make the area feel like an intentional outdoor living room.
Consider a gravel border that extends a foot beyond the fire brick ring. That extra strip catches sparks and gives you a dry place to set your feet after rain. It also ties the pit into the rest of the patio decor.
Safety tips to enjoy your backyard fire pit worry-free
Gravel fire pits are generally very safe, but a few basic habits keep everyone relaxed. Always clear dry leaves and pine needles away from the gravel before lighting a fire. Keep a garden hose connected and nearby, not coiled up in the garage. Use a spark screen if you are burning pine or other popping woods.
Never leave a fire unattended, even for a minute. After the flames die, spread the embers with a long metal poker and pour water over them slowly. Stir the ash to make sure everything is cool. The gravel underneath will stay cool to the touch within a few hours, but the fire bricks can hold heat longer. Teach kids and pets to stay a full arm’s length from the brick ring.
If you live in a dry climate, check local burn bans before planning your fire night. Many areas restrict open fires during summer droughts. A small propane fire pit insert can work as a backup
#BackyardFirePit #DIYPatioDecor #GravelFirePit #OutdoorLiving #FirePitIdeas
Leave a Comment